


We’ve all been there, trying to maximize time with a streamlined workflow that ends up taking hours anyway.
Culling – a most essential but very tedious and time-consuming process, some photographers might even say, never-ending!
Experts say that the best way to cull your photos quickly is by doing it in a single go!
Our hope is that with AfterShoot; you can improve your workflow exponentially by letting it do the heavy lifting for you while you take back precious hours from your day to focus on things that are more important to you!
Introducing AfterShoot
AfterShoot is a fully automated image culling software that aims to cut down time you spend on culling and selecting your photos.
Unlike other AI-powered image culling solutions, AfterShoot runs locally on the user’s system and lets the user retain full control on the selections and make it extremely easy to review and edit the selections made by AfterShoot.
With the help of AfterShoot, you can save hours and take back control of your time to focus on things that matter the most to you! Be it spending more time with the ones you love or working on growing your business.
Who is AfterShoot Meant For
While automated culling is something that all genres of photographers might benefit from, the ideal target audience for AfterShoot is photographers who deal with a large volume of photos.
This would make photographers shooting Weddings, Events, Portraits, and Journalism an ideal audience for AfterShoot.
That said, if your photoshoot involves humans, AfterShoot should work without any issues. However, some of our users have found AfterShoot to work well on Product and Landscape shoots as well!
Platforms and Image Formats Supported by AfterShoot
AfterShoot supports both Windows and macOS devices having at least 4 core CPUs and 8GB RAM.
As far as image formats go, we support all the leading RAW formats along with JPEGs and PNGs.
How to Use AfterShoot
Using AfterShoot is a four-step process. Make sure that you have a folder of RAW/JPEG photos that you want to cull ready with you.
For best results, please ensure that you ingest and cull your photos with AfterShoot prior to importing them into Lightroom or Capture One.
Note: If you would like to cull your photos after importing them into Lightroom or CaptureOne, please head over to the following blogpost on alternate workflows with AfterShoot!
https://events.aftershoot.com/tutorials/different-workflows-with-aftershoot/
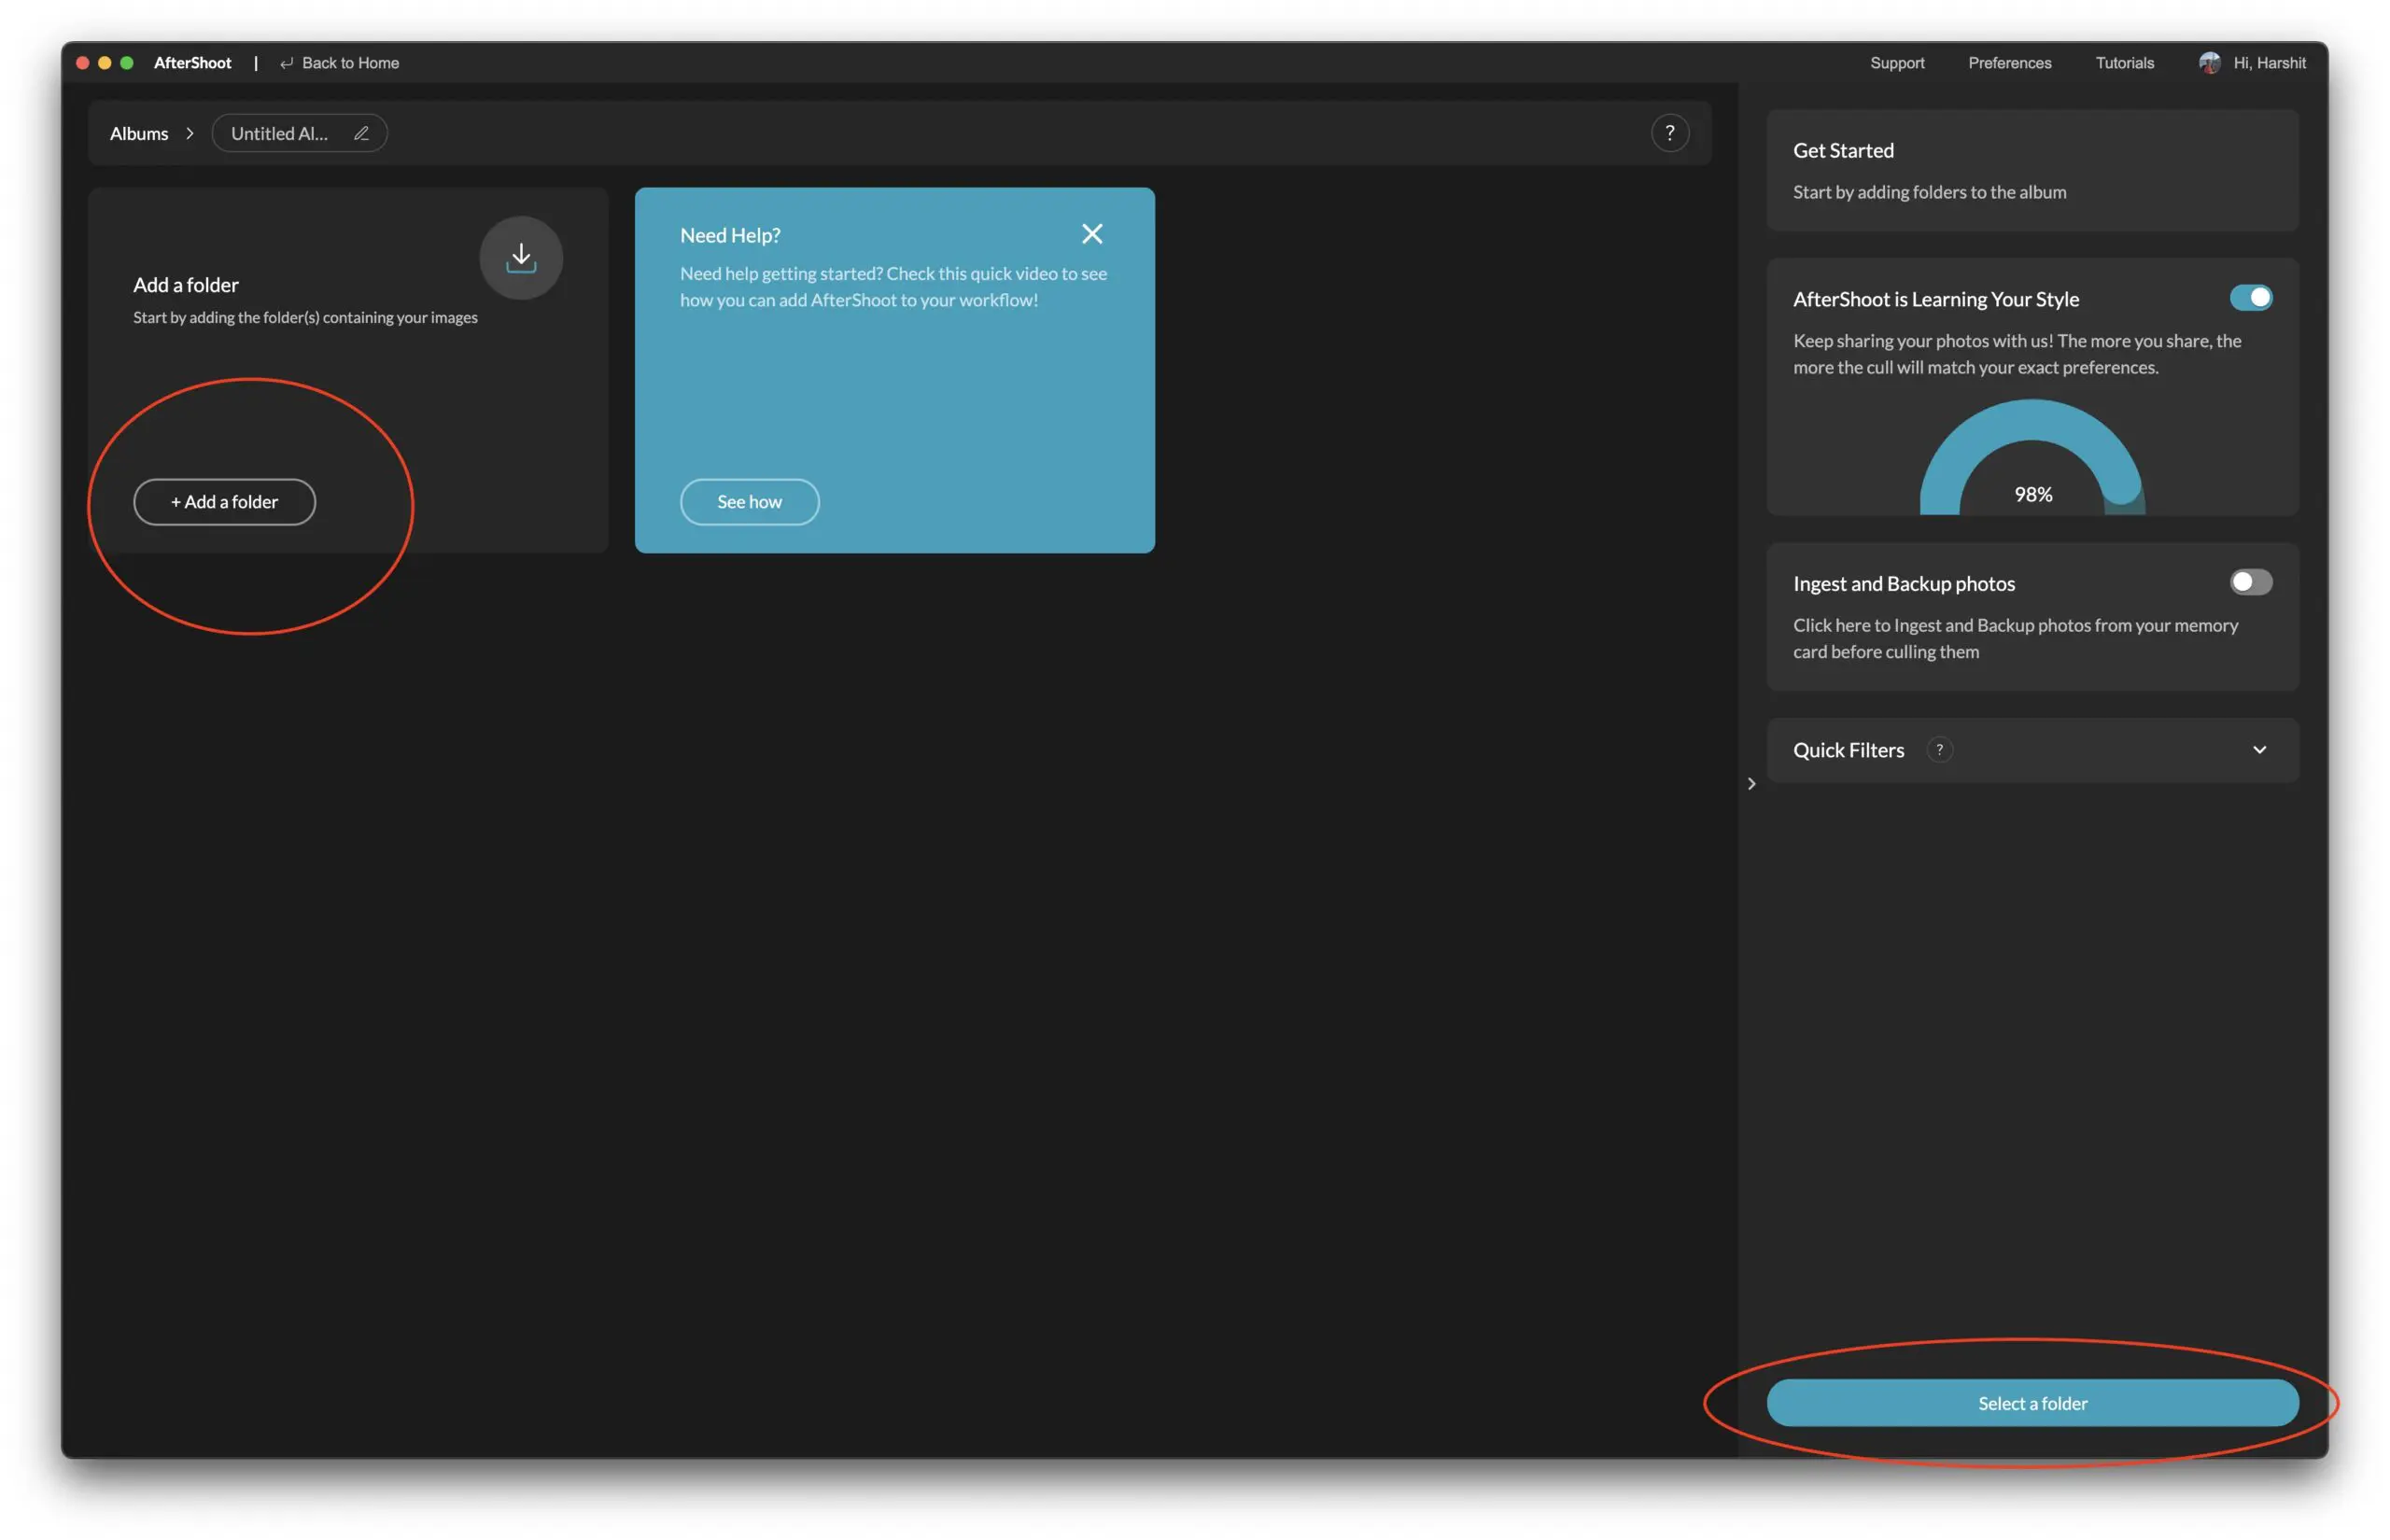
Step 1: Creating an Album and Importing Photos
To get started, create a new album in AfterShoot and drag-drop your folder of photos into AfterShoot.
AfterShoot will then acknowledge the added folder and automatically start importing your photos. You can then either wait for the import process to complete (usually takes a few minutes for a typical shoot) or click on the “Start Culling” button to proceed with the next steps.
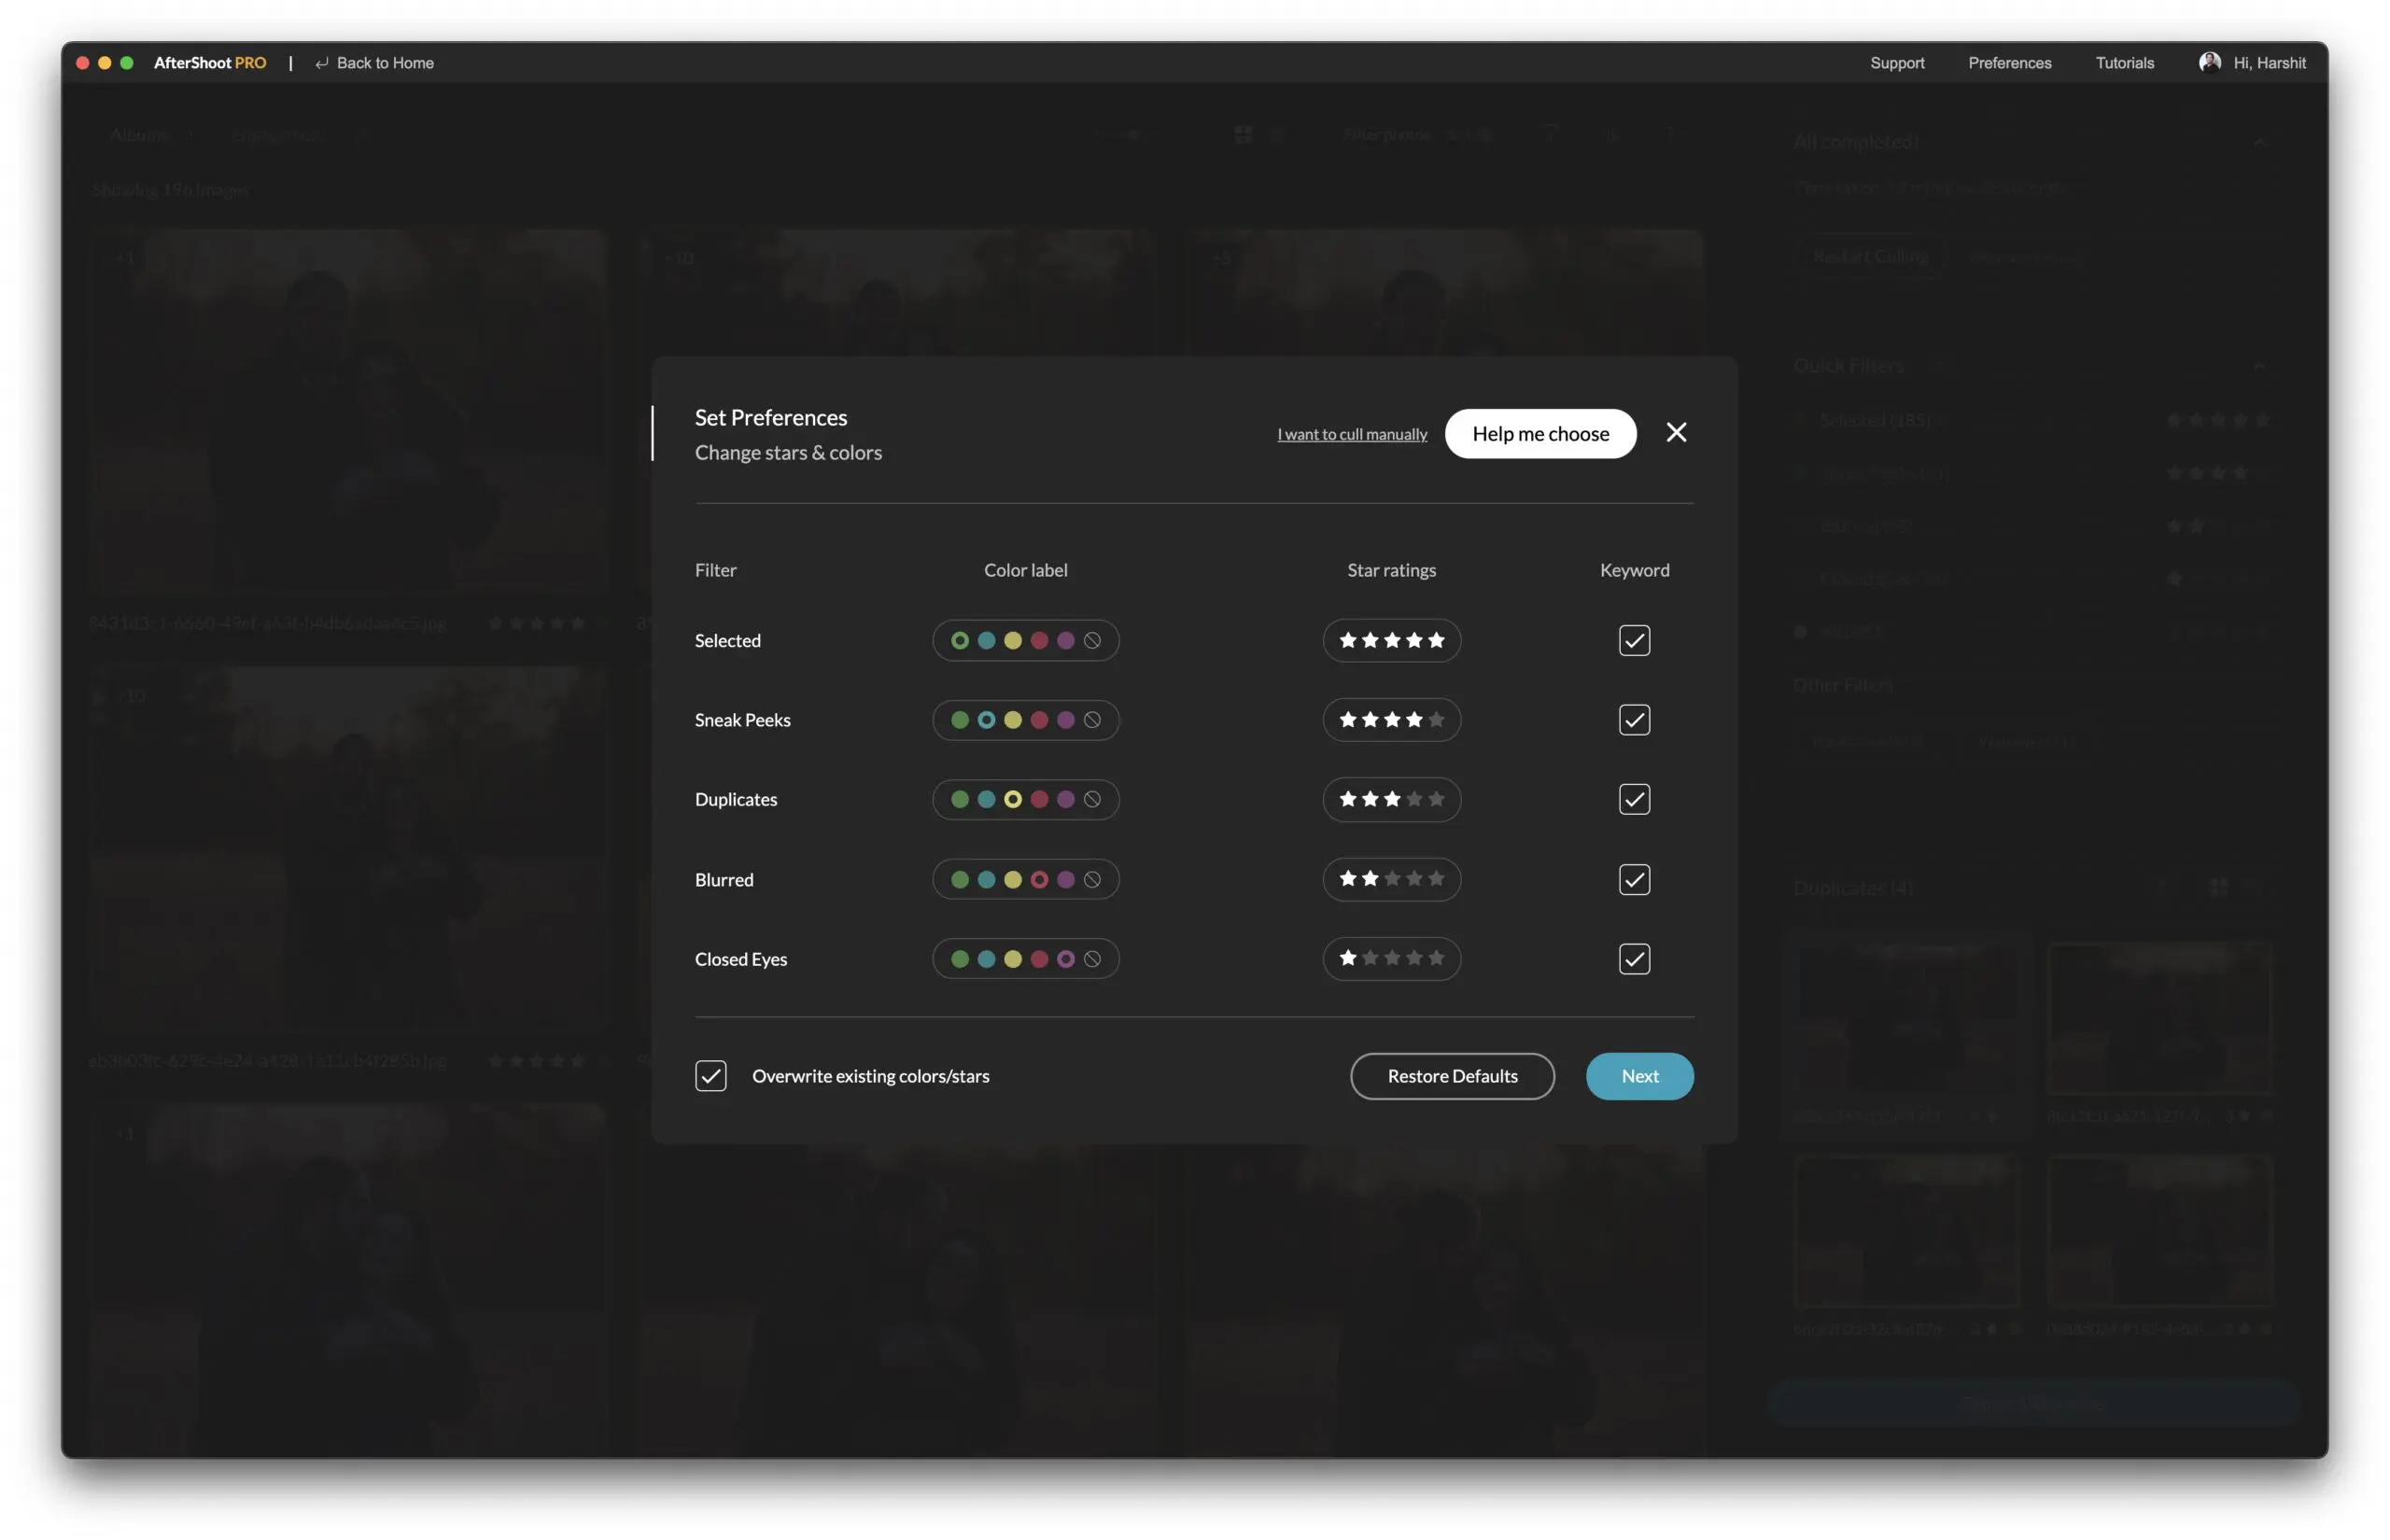
Step 2: Selecting Your Preferences and Thresholds
Once you click on “Start Culling”, you will be greeted with a dialog to select your preferences and thresholds for culling.
The dialog is broken into two parts; the first part lets you select the Color Labels and Star Ratings that you would like to set to photos that are assigned to various filters like “Blurred”, “Closed Eyes”, “Duplicates”, “Selected”, etc.
You can feel free to customize these according to your preferences, or leave everything as default if you’d like.
The second part lets you select the strictness for culling the photos. This screen is important as the thresholds you select here will affect how many or how few photos you get from AfterShoot!
As a rule of thumb, keeping your slider on the extreme right will give you the least number of selected photos while keeping it on the left will give you the most number of selected photos.
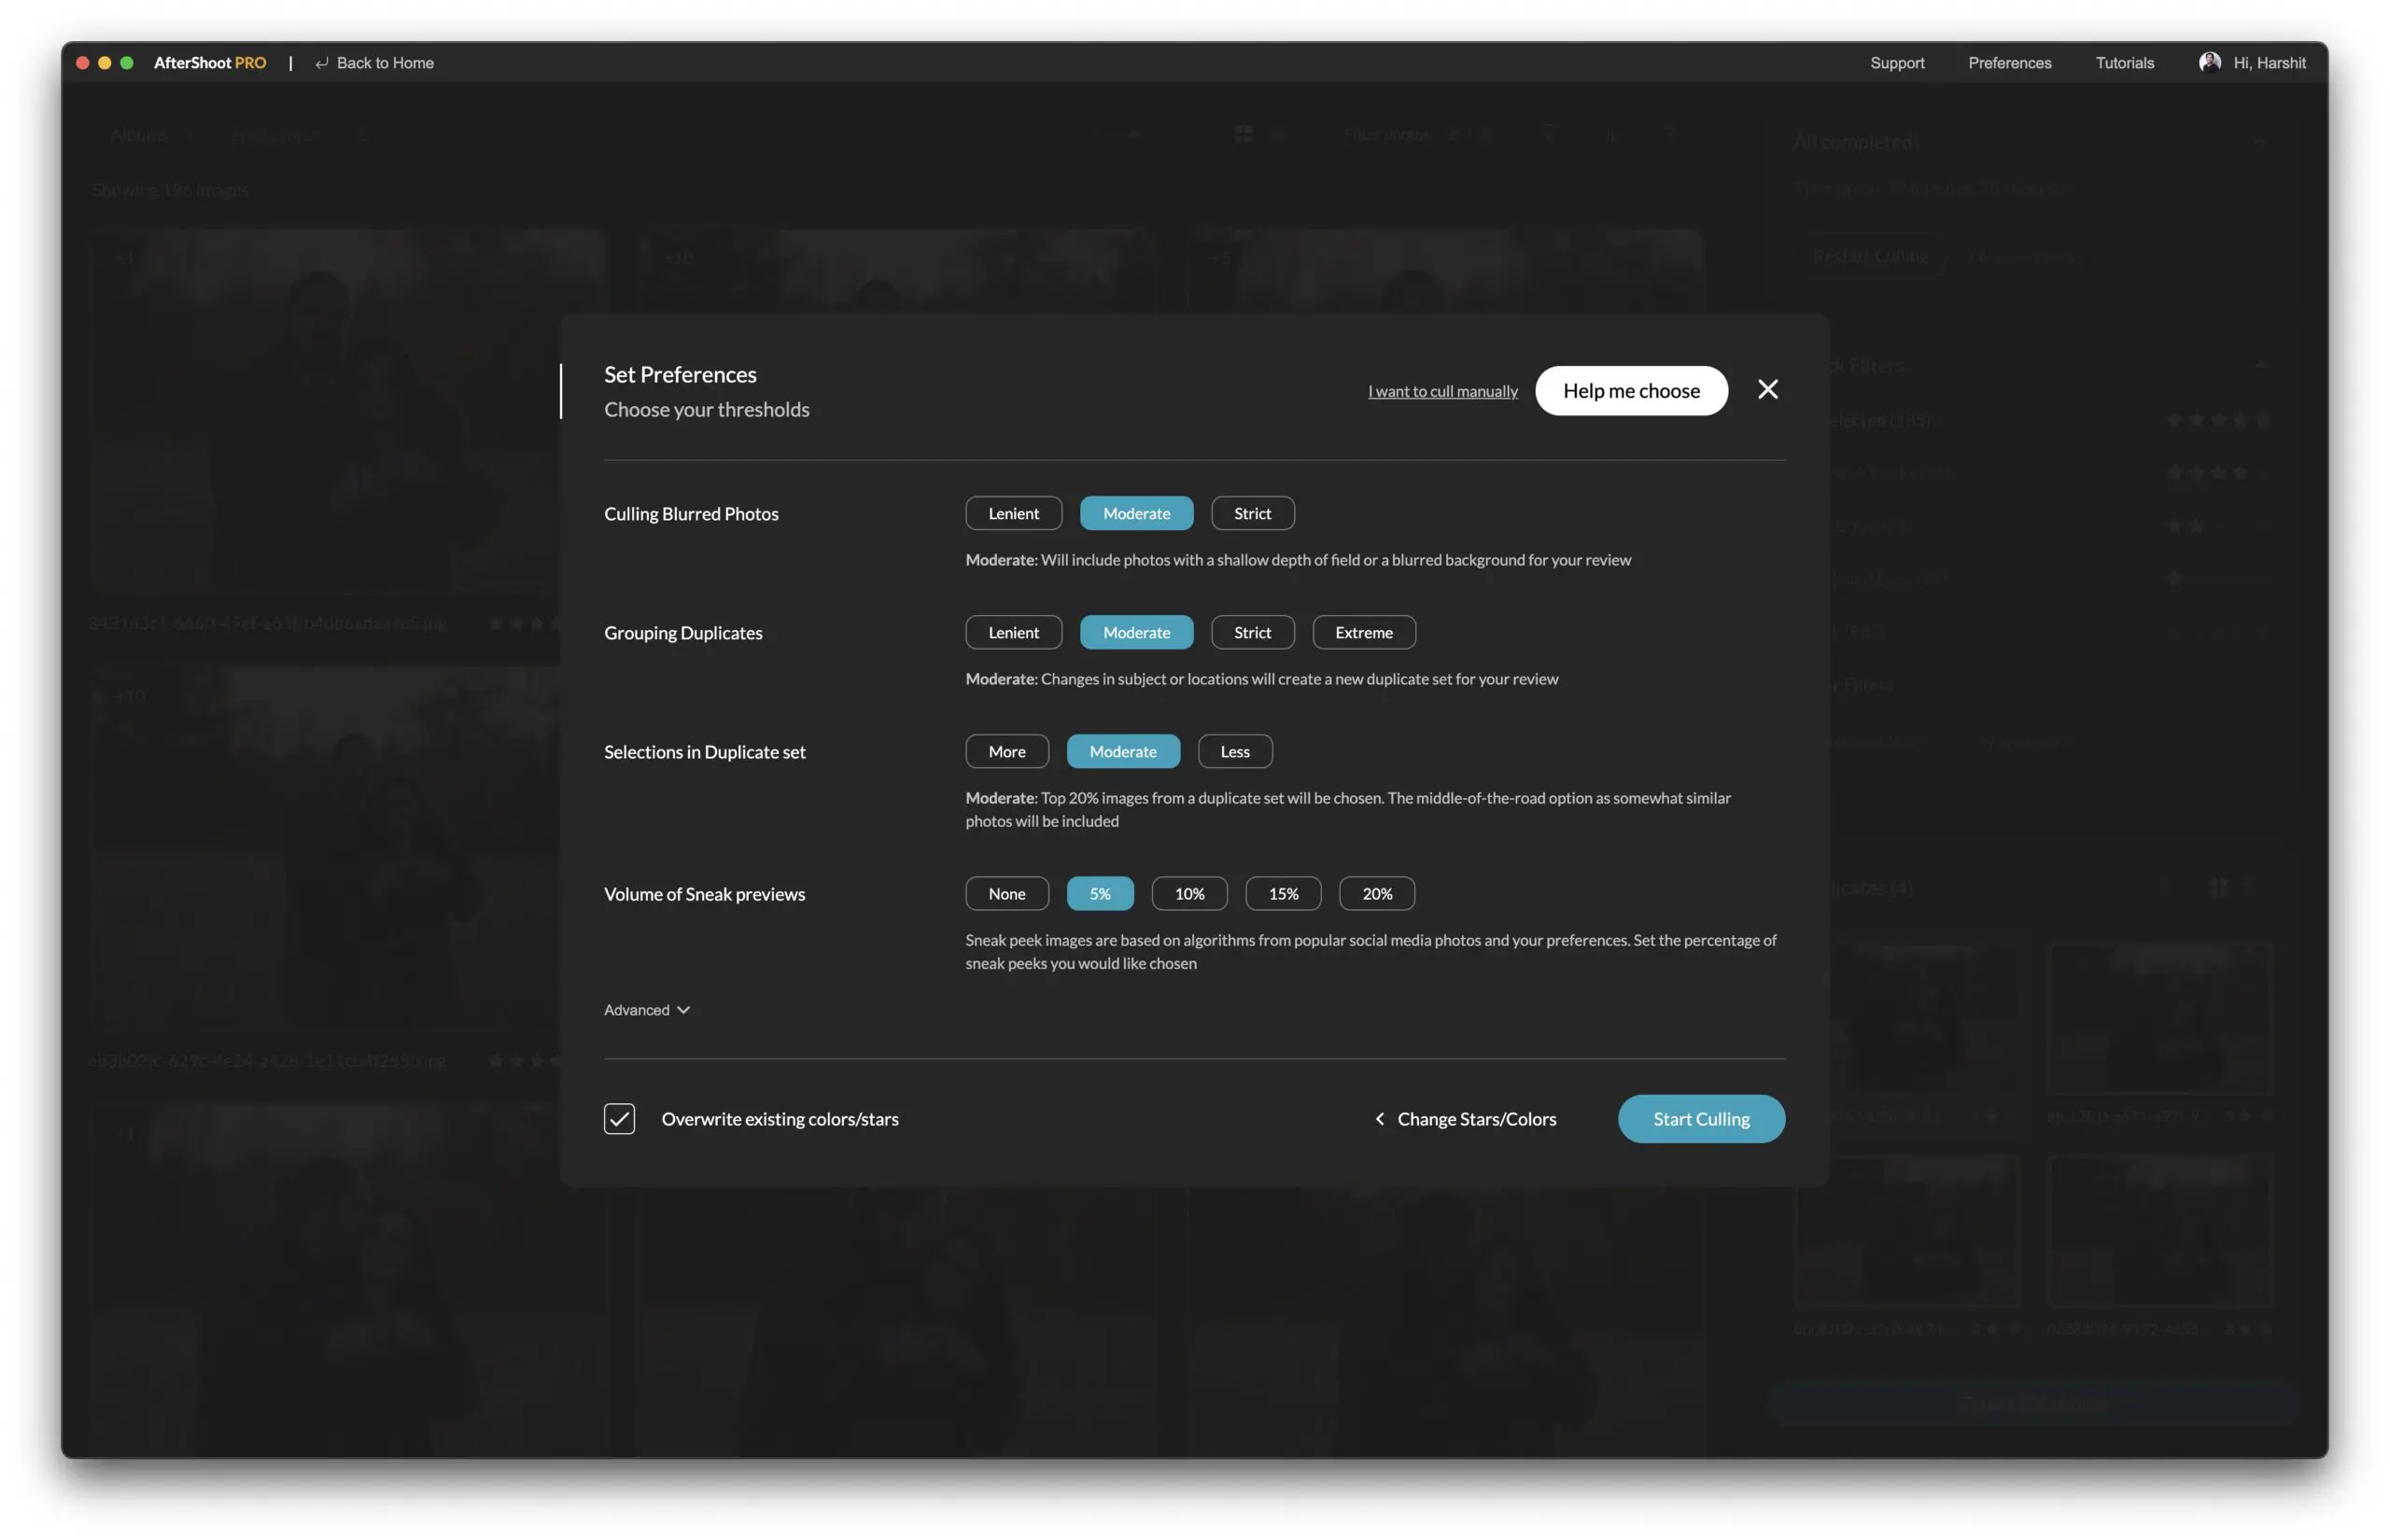
A detailed breakdown of these filters and sliders can be obtained by hovering the mouse over the slider.
After the thresholds have been set, press “Start Culling”, AfterShoot will start importing and culling your photos.
You can sit back and relax or work on older edits of yours. Once AfterShoot is done, it will send you a notification (and a completion email if you are logged in).
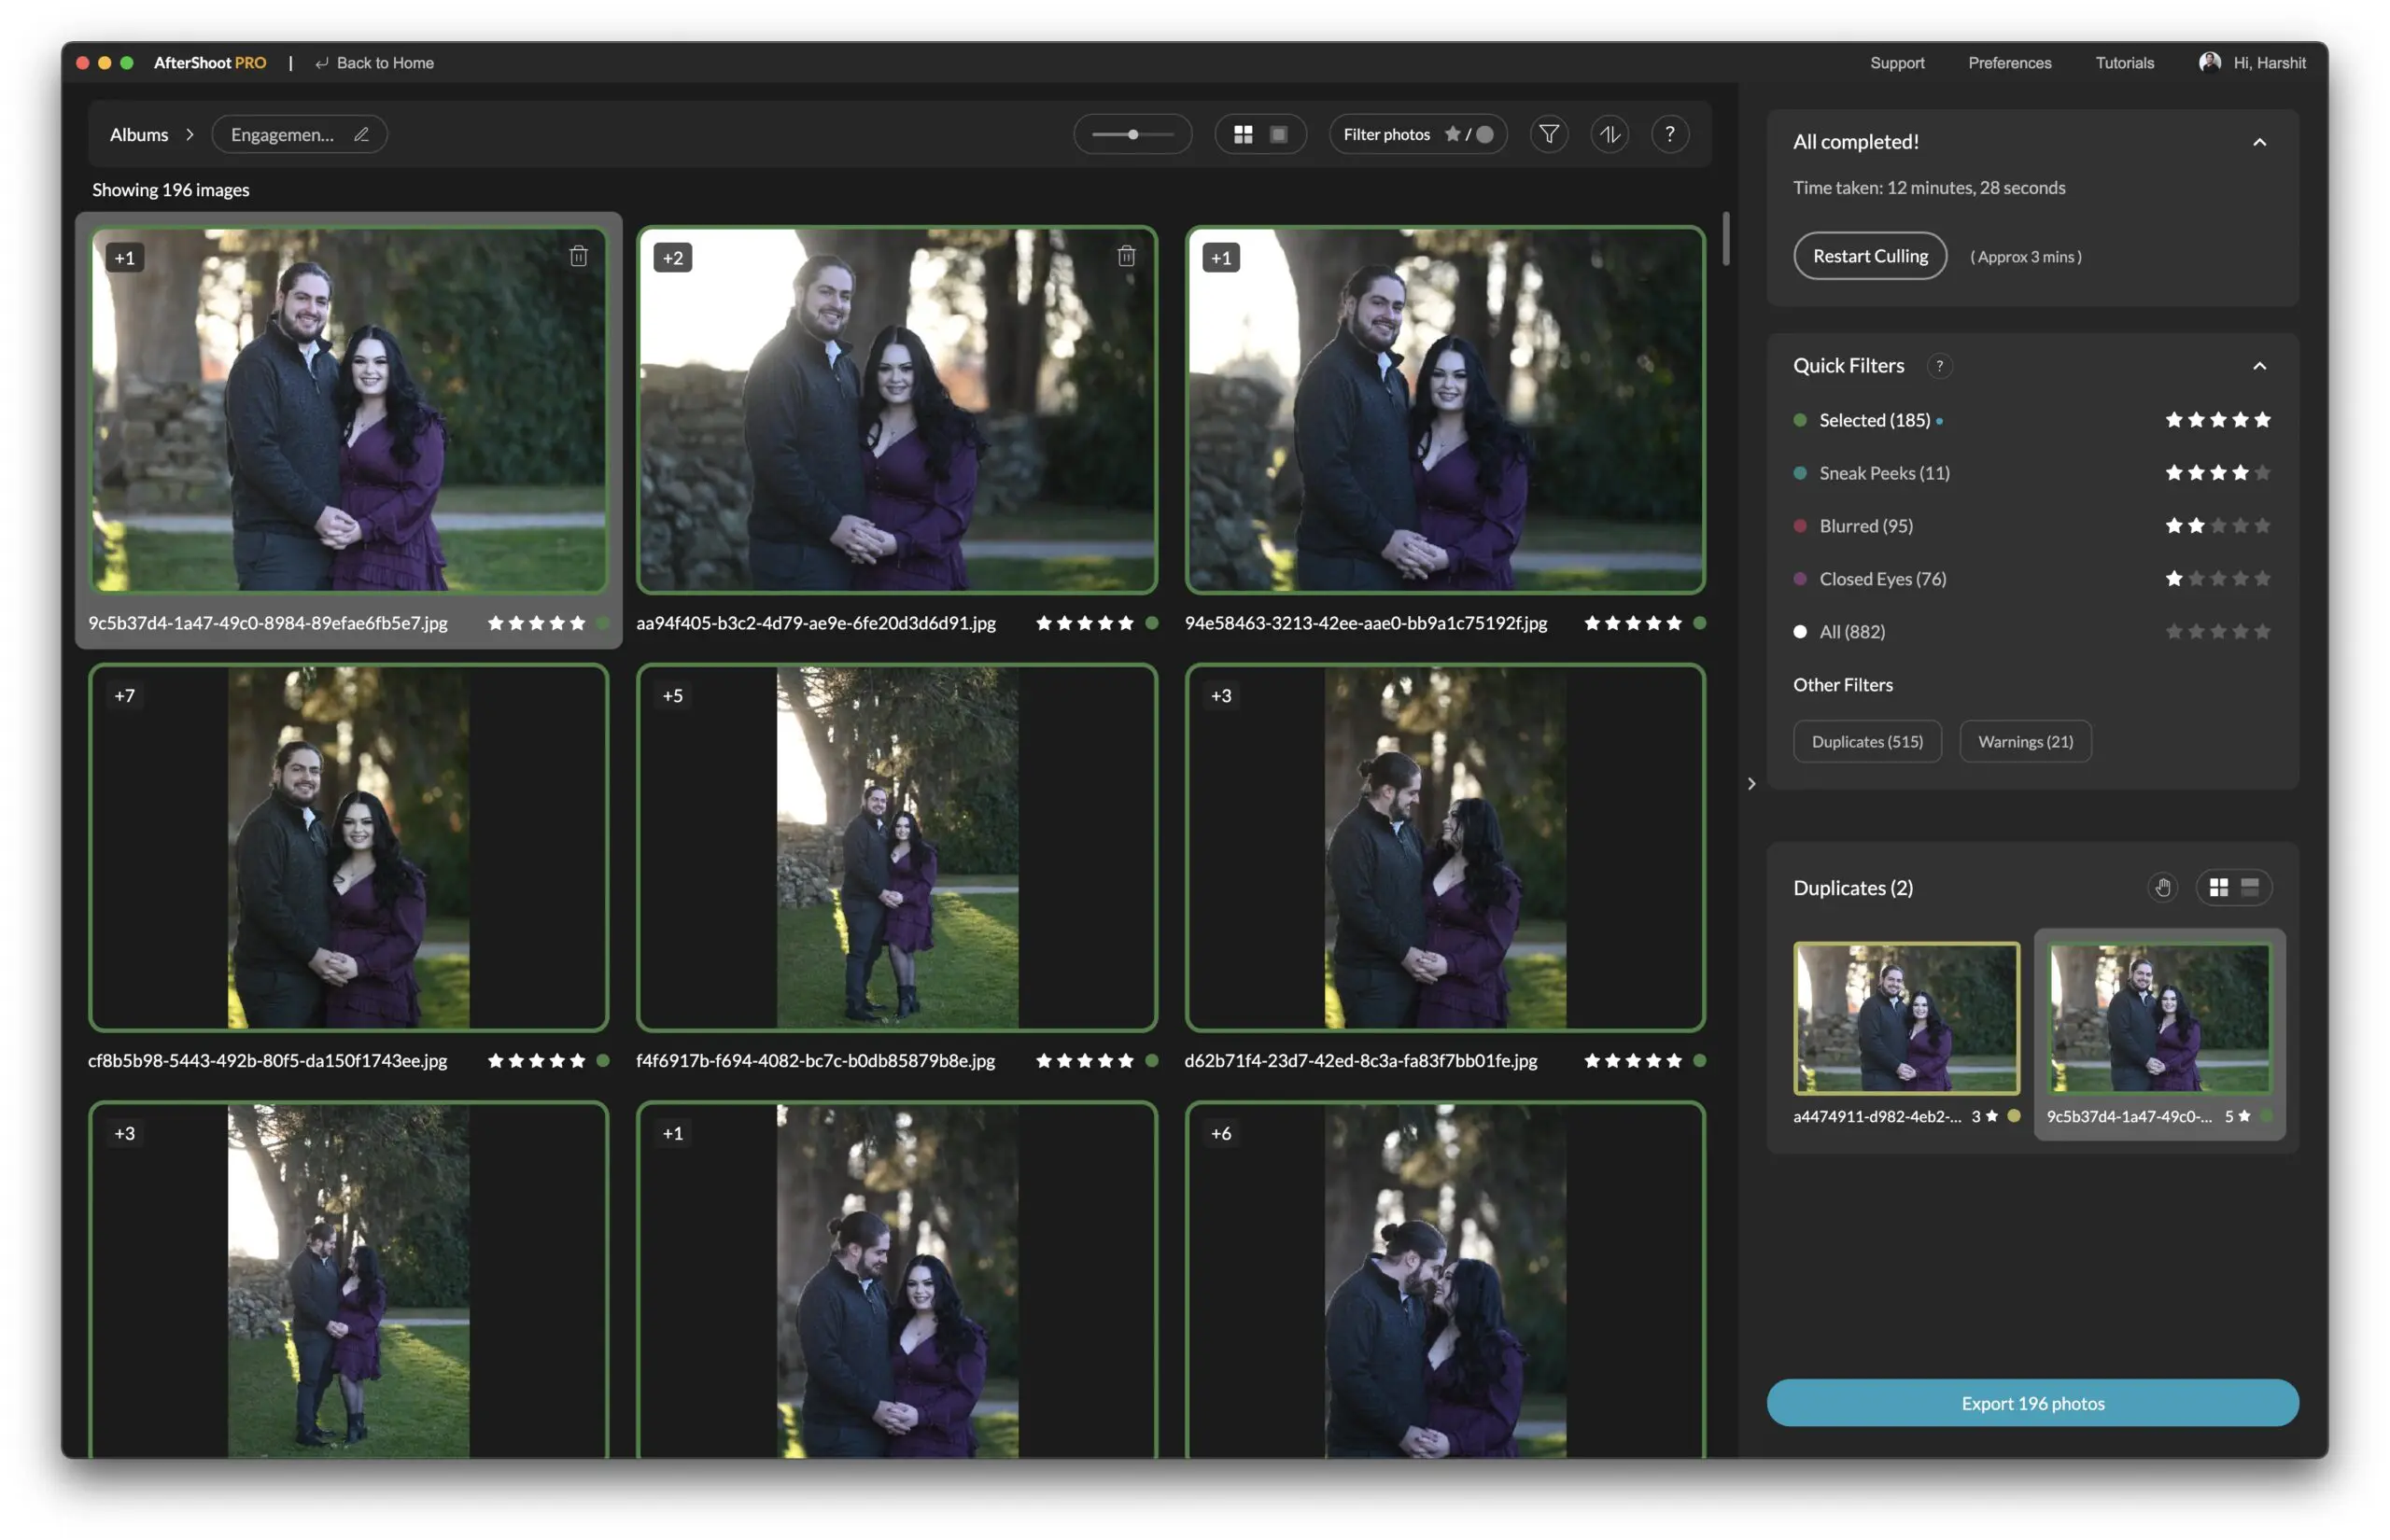
Step 3: Viewing and Changing Selections
Once AfterShoot is done with the culling, you can either directly export the culled photos into Lightroom Classic or Capture One, or edit the selections made by AfterShoot before you export.
Editing the results is super easy with AfterShoot, as it gives you all the tools you need to make a decision.
There are two screens that let you make changes to your results. Let’s have a look at both of them.
The first screen is the Grid View that opens after your album is done culling. This lets you view multiple photos quickly and make changes to the selections made by AfterShoot.
In this screen, apart from viewing all of your photos, you also have options to choose quick filters to view photos that are associated with a particular keyword like “Blurred”, “Selected”, “Closed Eyes”, etc.
For advance filtering of photos, you can specify a star rating and/or color label to view the photos.
For example, in the screenshot below, removing the image JB2_4870.jpg from selected can be done as follows:
First, you click on the image once to highlight it. Once it’s highlighted, you can either click on the Star/Color below the image to change the star rating or color labels of the image.
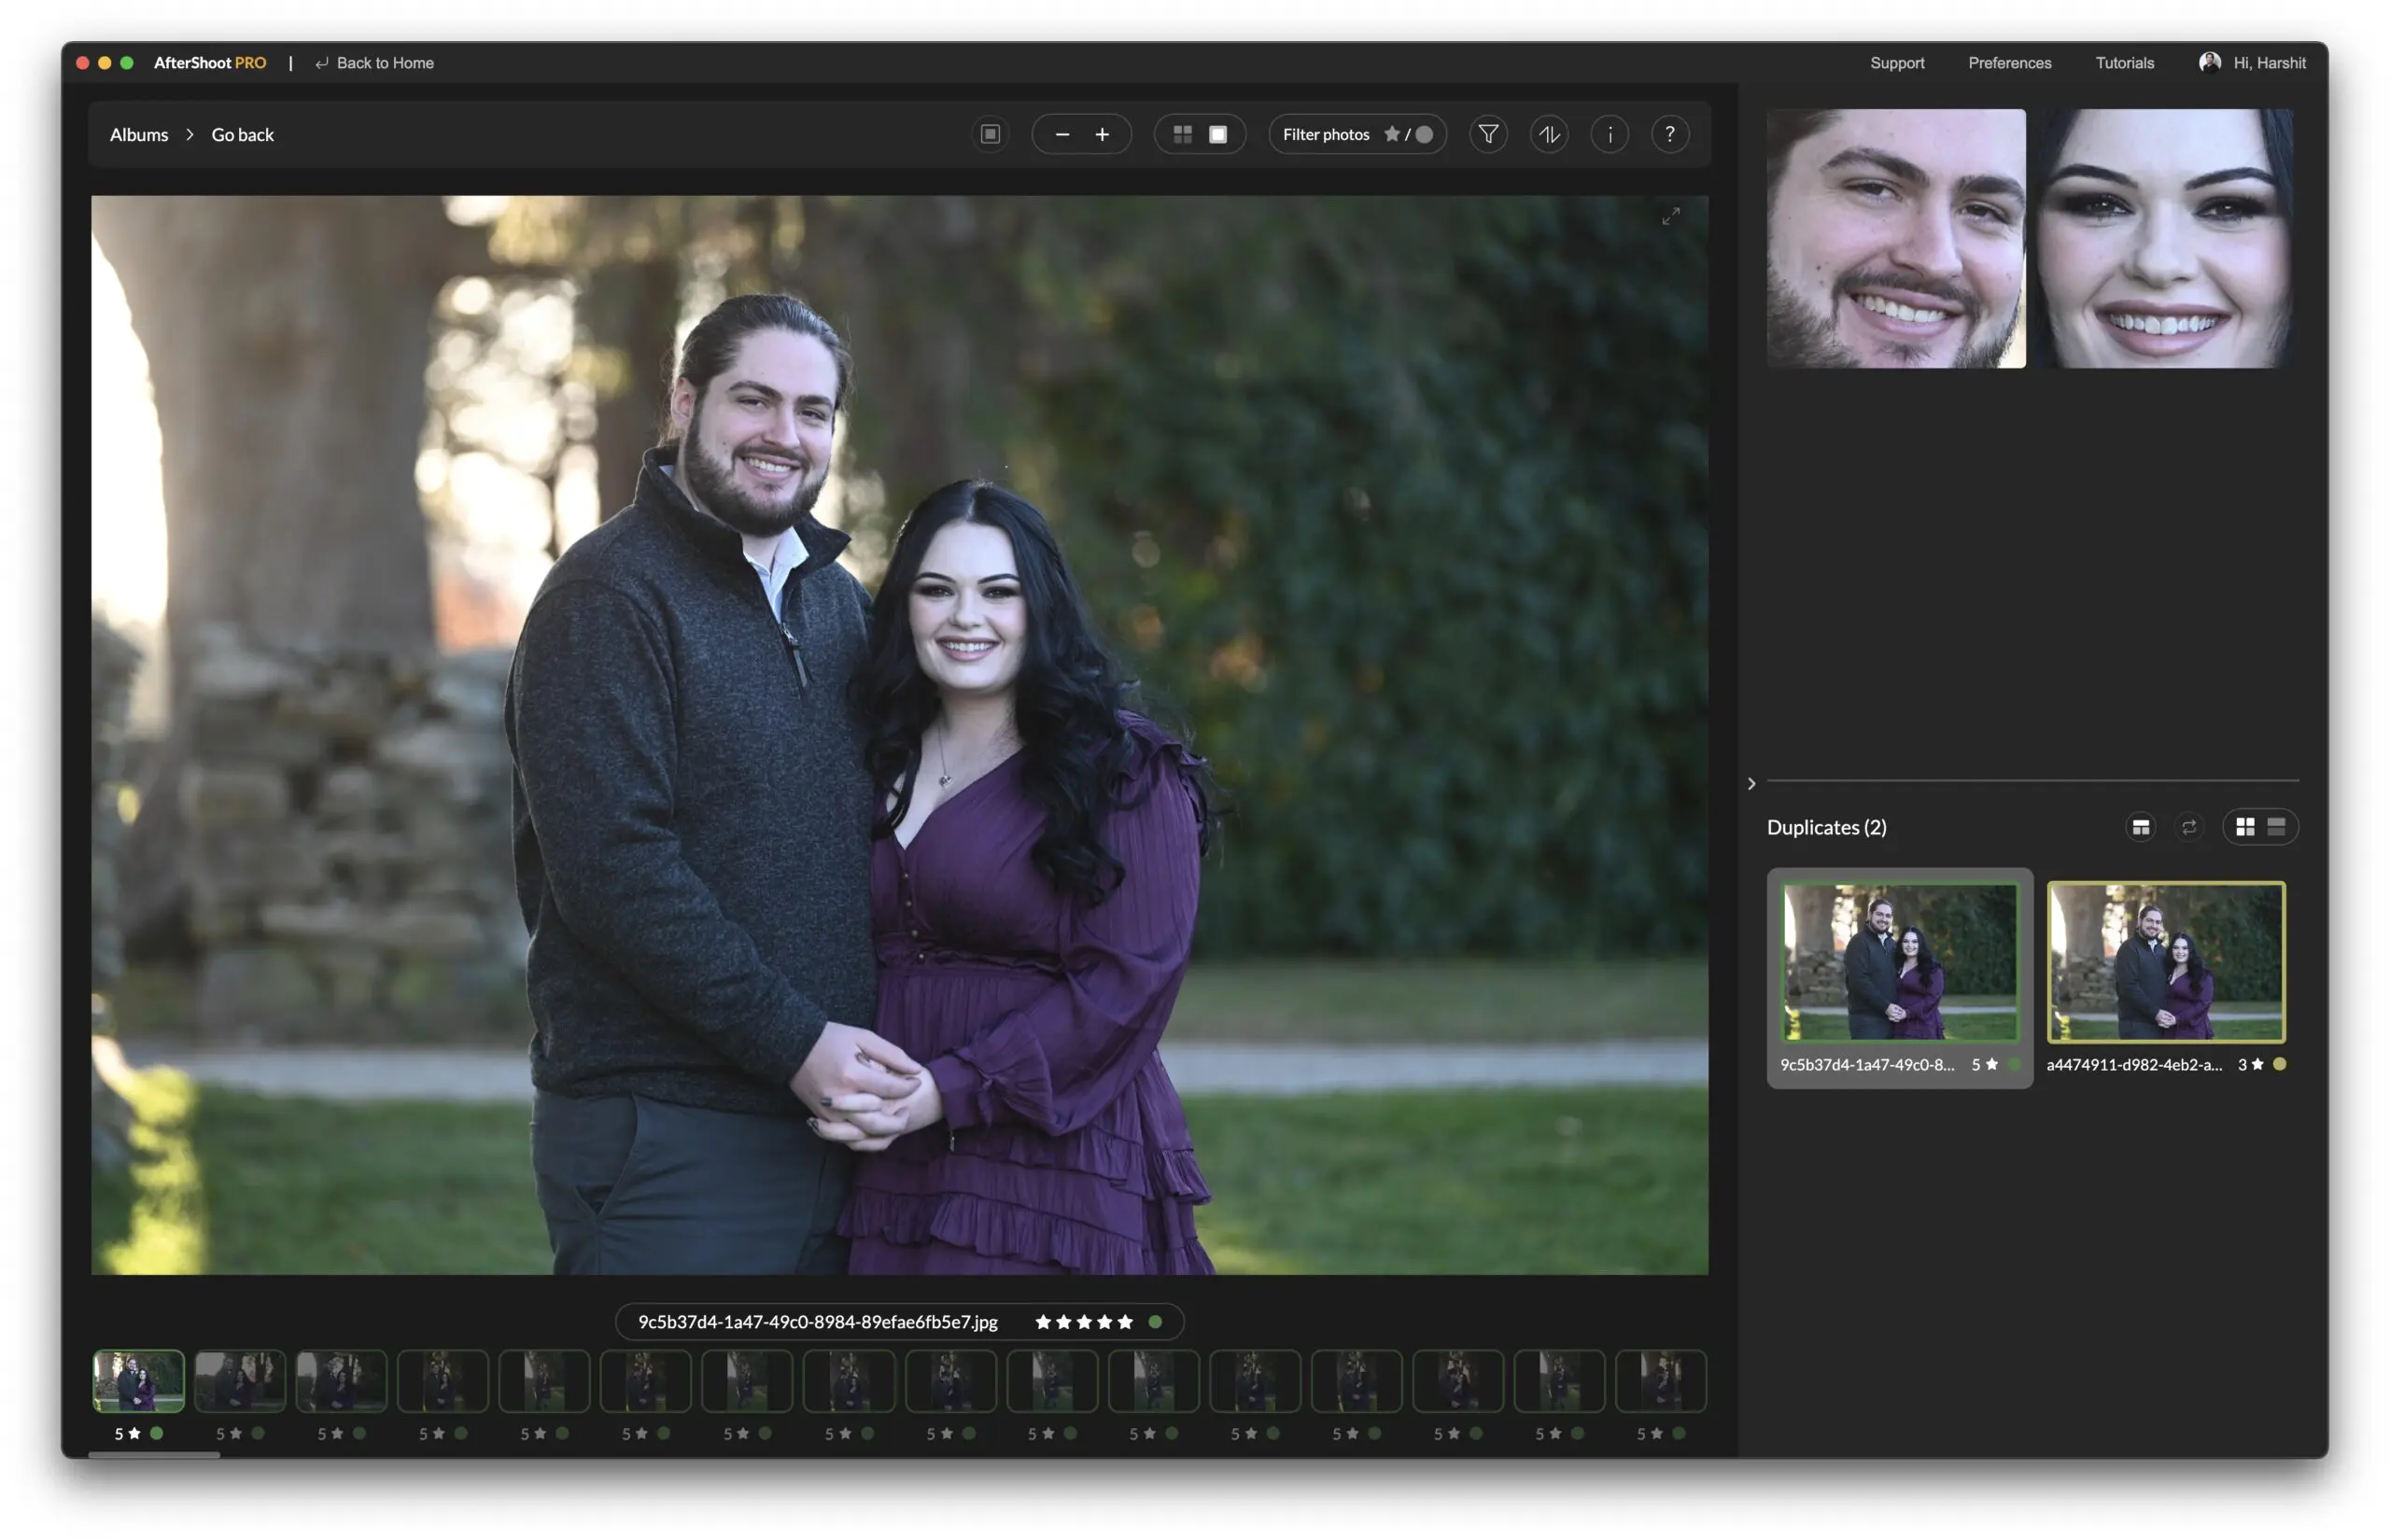
The second screen that lets you change your selections is the Loupe View. As opposed to Grid View which lets you look at multiple photos at once, the Loupe View focuses on a single image at once.
This screen also provides you with Advance Features like aggregating and showing the Key Faces in an image and the Duplicates for an image for a quick comparison between them.
Similar to Grid View, you can also change your selections by using keyboard shortcuts or clicking on the stars and colors.
The biggest workflow enhancement of culling photos in Loupe View is the ability to view similar photos for the image that you’re currently viewing.
You can instantly switch between the photos by clicking on a different image displayed on the bottom right. You can also use keyboard shortcuts to do this (Cmd + Arrow Keys on Mac and Ctrl + Arrow Keys on Windows).
Once you have a duplicate image selected, the main image will be changed to reflect your selection. You can then again mark this as a keeper or reject by using keyboard shortcuts or clicking on the stars and colors.
Loupe View also lets you zoom in directly to the Key Faces detected in the image. To do this, you can click on the detected faces in the right or use the keyboard shortcut (Options + Arrow Keys on Mac and Alt + Arrow Keys on Windows).
AfterShoot also lets you use keyboard shortcuts to change the Color/Star Ratings. You can head over to this blog post to see how you can do so!
https://events.aftershoot.com/tutorials/using-keyboard-shortcuts-in-aftershoot/
Step 4: Saving the Changes and Exporting Photos
After you’re done with culling, the next step is to save the results and export the photos into Lightroom or CaptureOne for editing.
Saving the Results
Note: If you haven’t made any changes to AfterShoot’s selections, you don’t need to do this and you can directly export your results.
After making changes to AfterShoot’s selections (if needed), you’ll notice that the “Export Photos” button in the GridView changes to the “Save Results” button. Simply click this button to save your changes and once the results are saved, this button will turn back to “Export Photos”
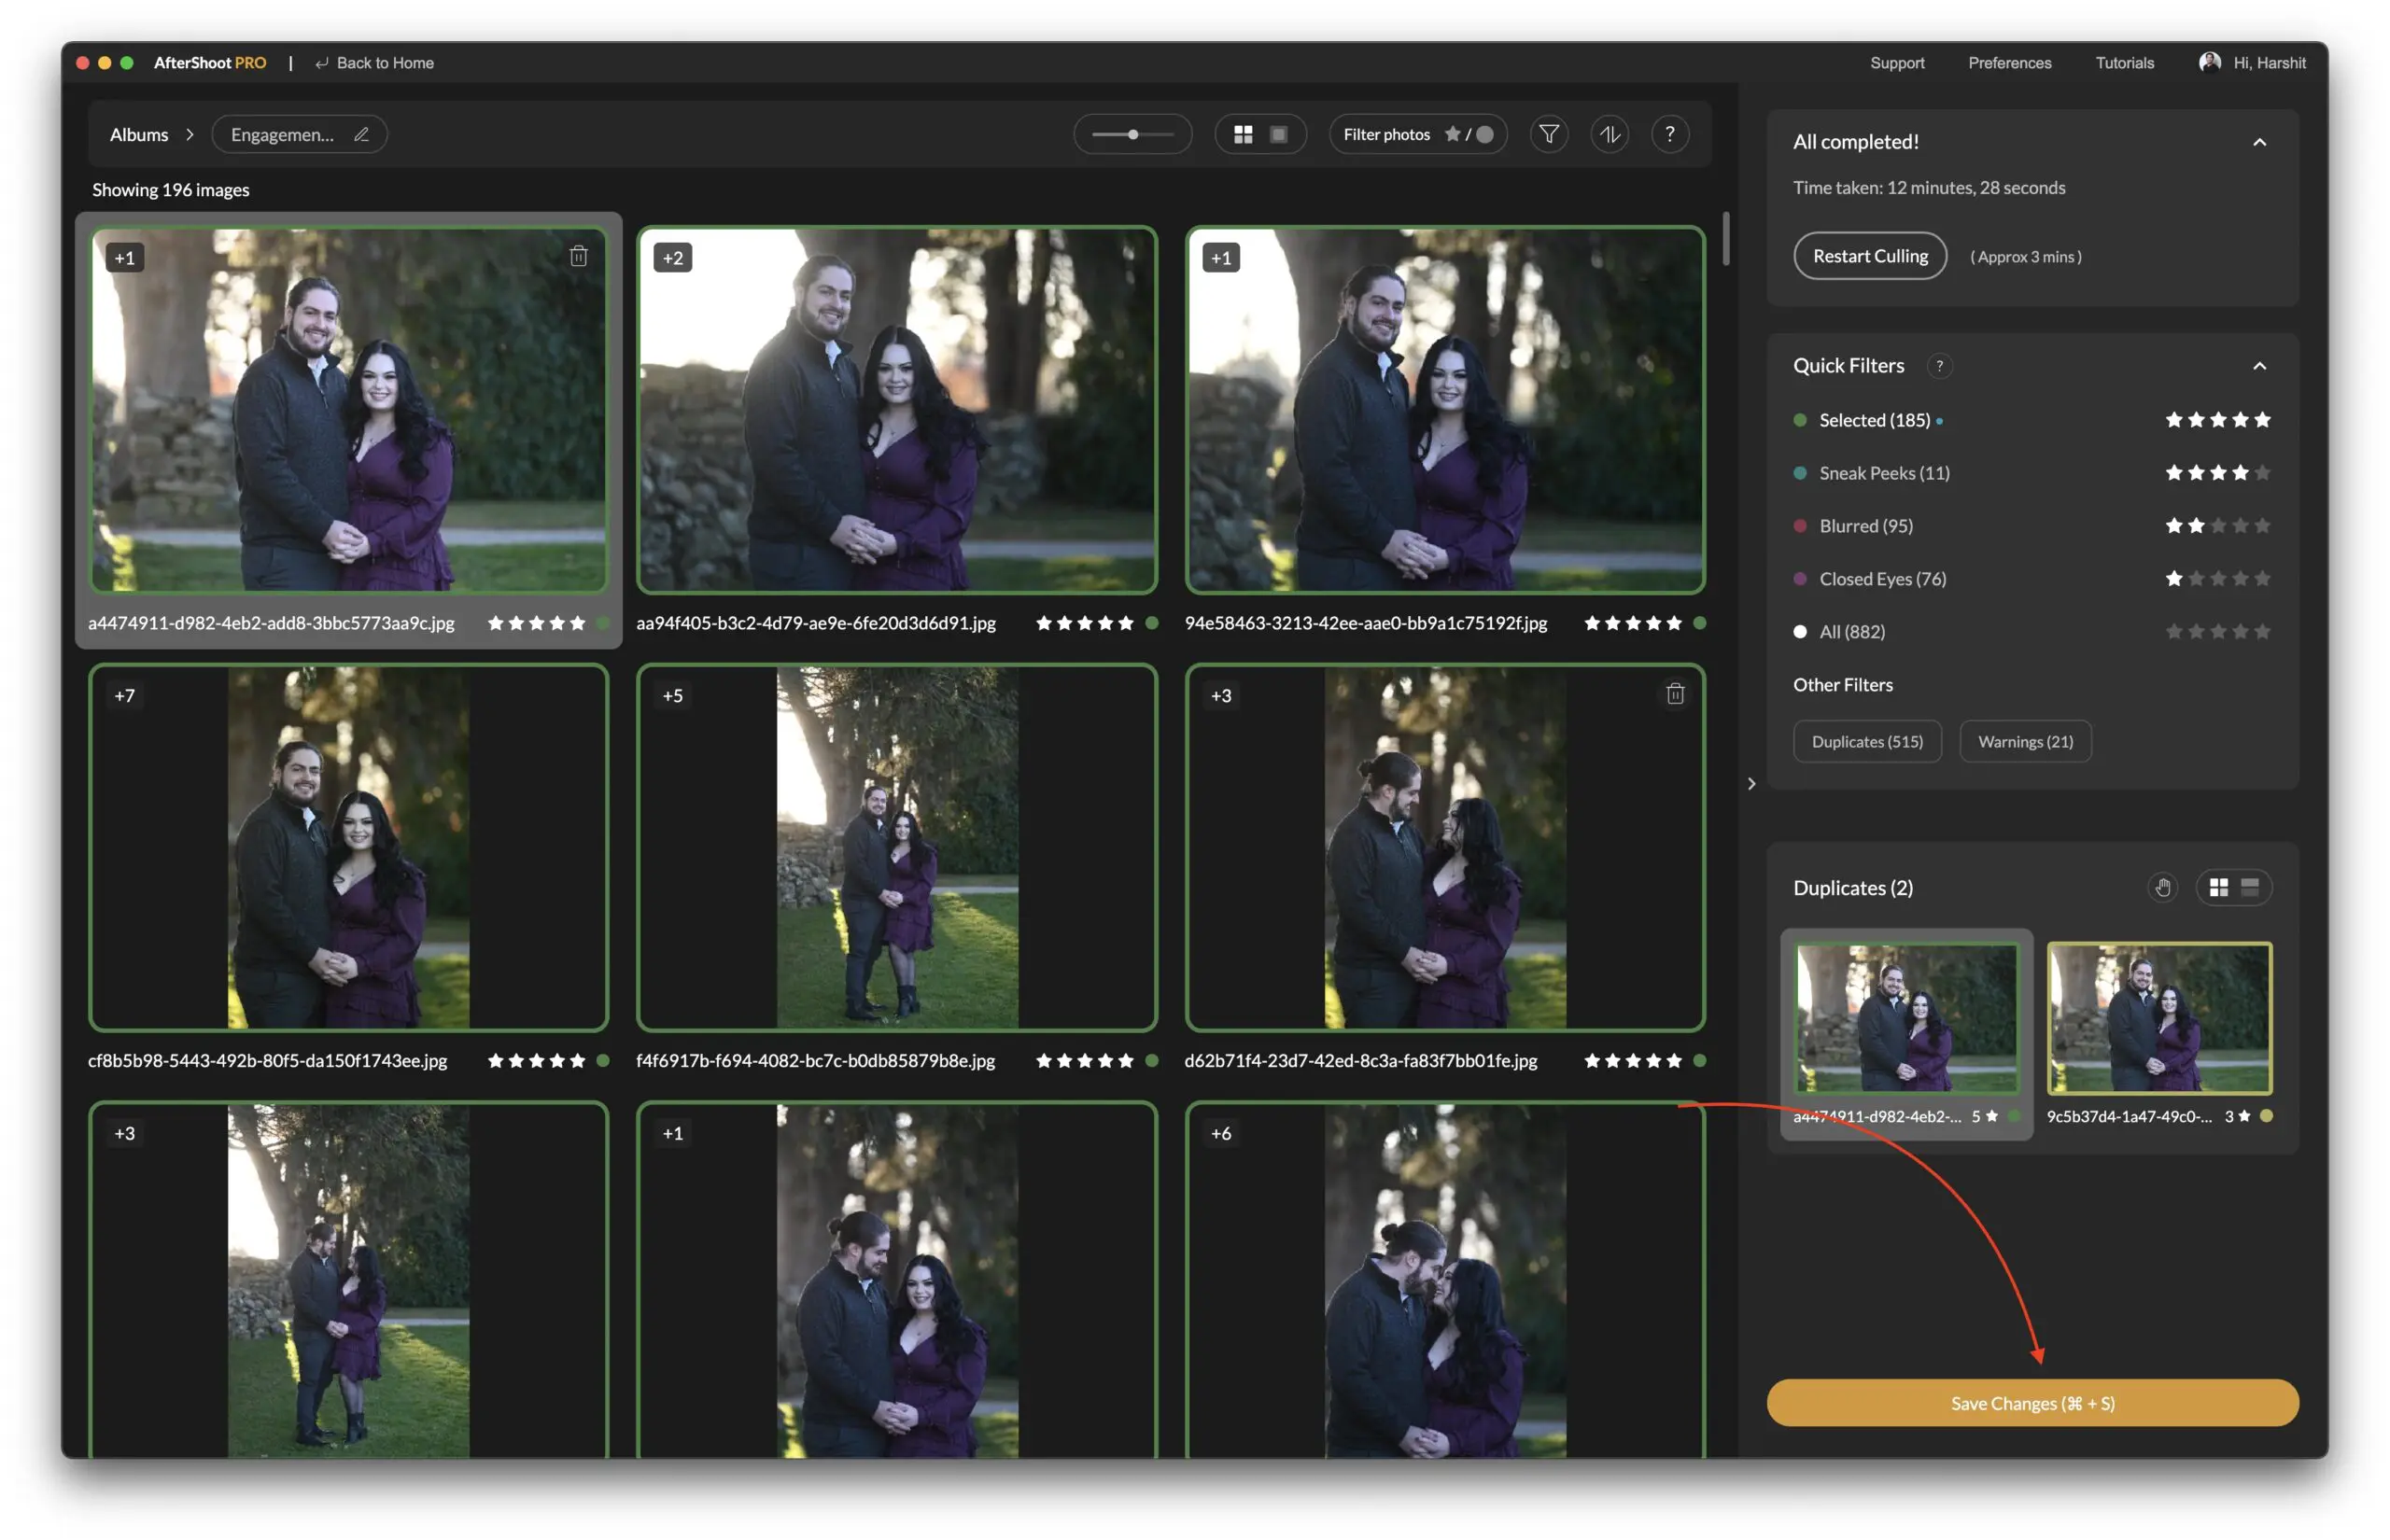
You can also press Cmd + S on macOS or Ctrl + S on Windows to save the results.
Exporting Photos
To begin exporting the photos, head over to the Grid View and choose “Selected Photos” from the Quick Filters to export the selected photos into Lightroom or Capture One.
Note: If you want to export all your photos instead, choose “All Photos” from the Quick Filters.
Then click the “Export Photos” button in the bottom right, doing which should open up a dialog that lets you choose where you want to export your photos to. Currently, we have support for Lightroom and Capture One (macOS only) and also an option to copy/move your photos to a folder of your choice.
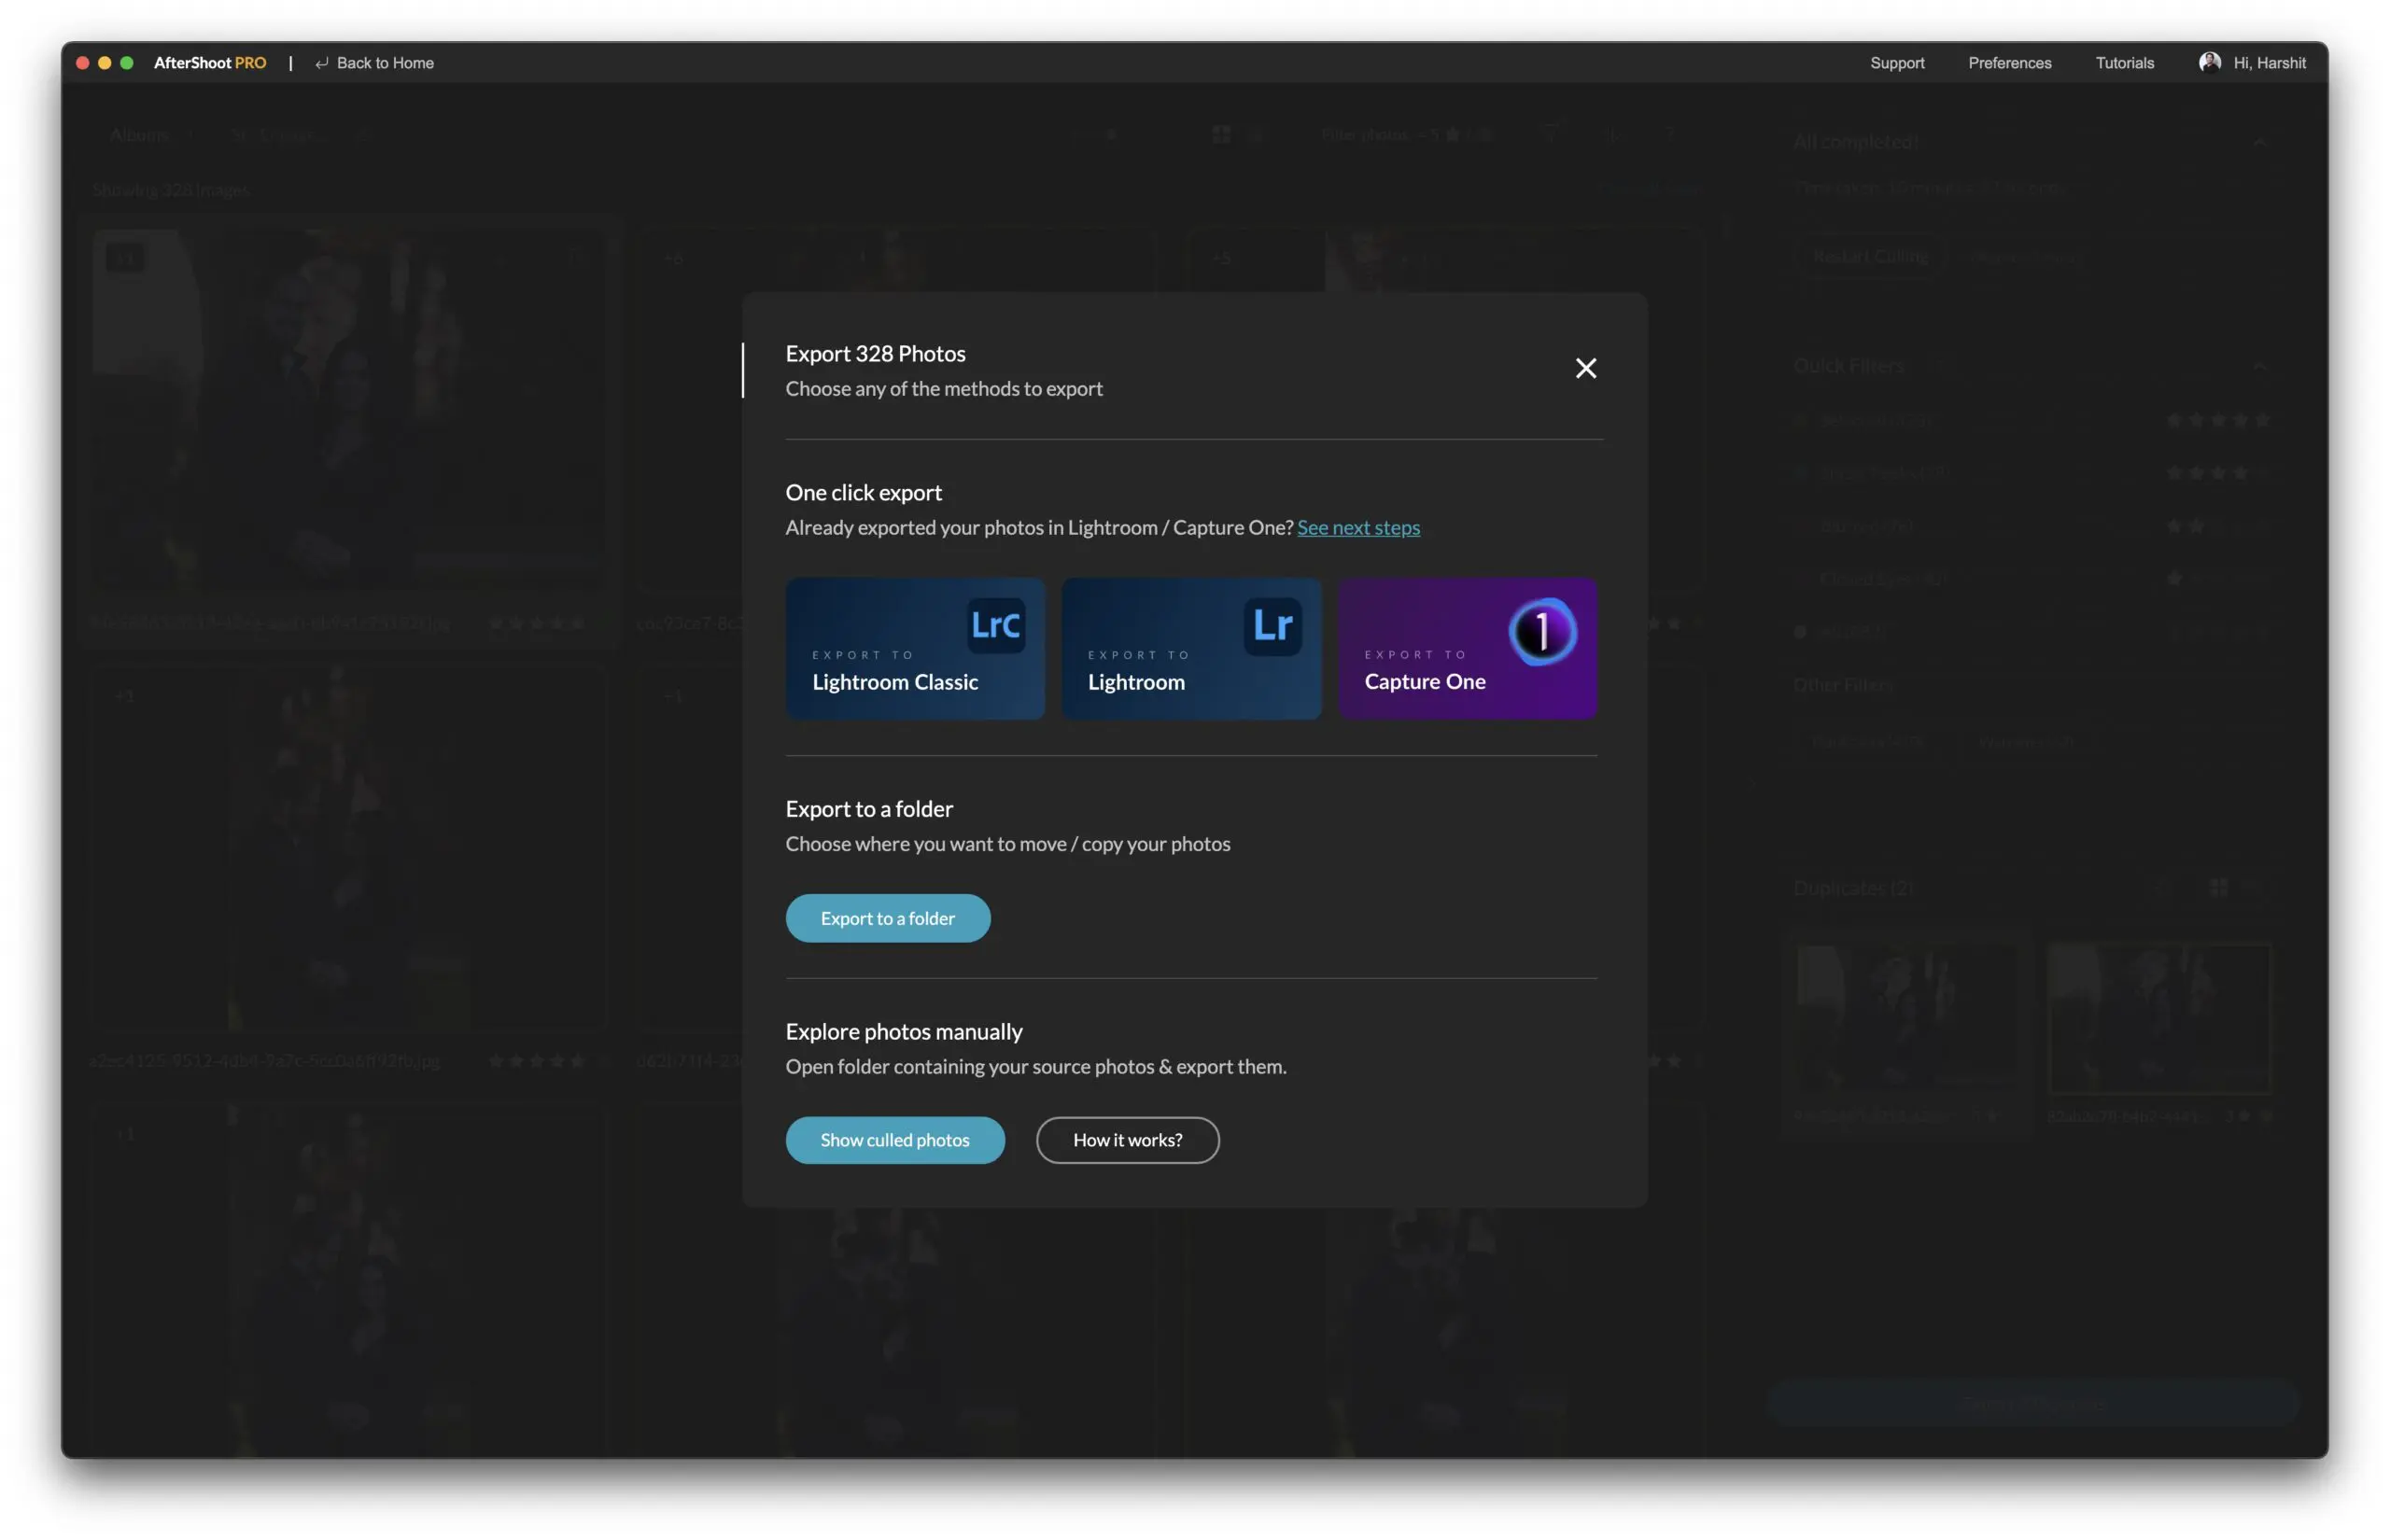
Once you click on the app where you want your photos to be exported to, it will open up the chosen app and open the Import Screen with the selected photos chosen for you.
Note: For people using AfterShoot on Windows, due to technical limitations it’s not possible to preselect the “Selected Image” on the import screen. So instead, AfterShoot will let you import all of your photos into Lightroom or Capture One.
From here, you can simply click on the import button and let Lightroom or Capture One import your photos. After the import is completed, you should be able to see the star rating and color labels applied by AfterShoot reflected here as well.
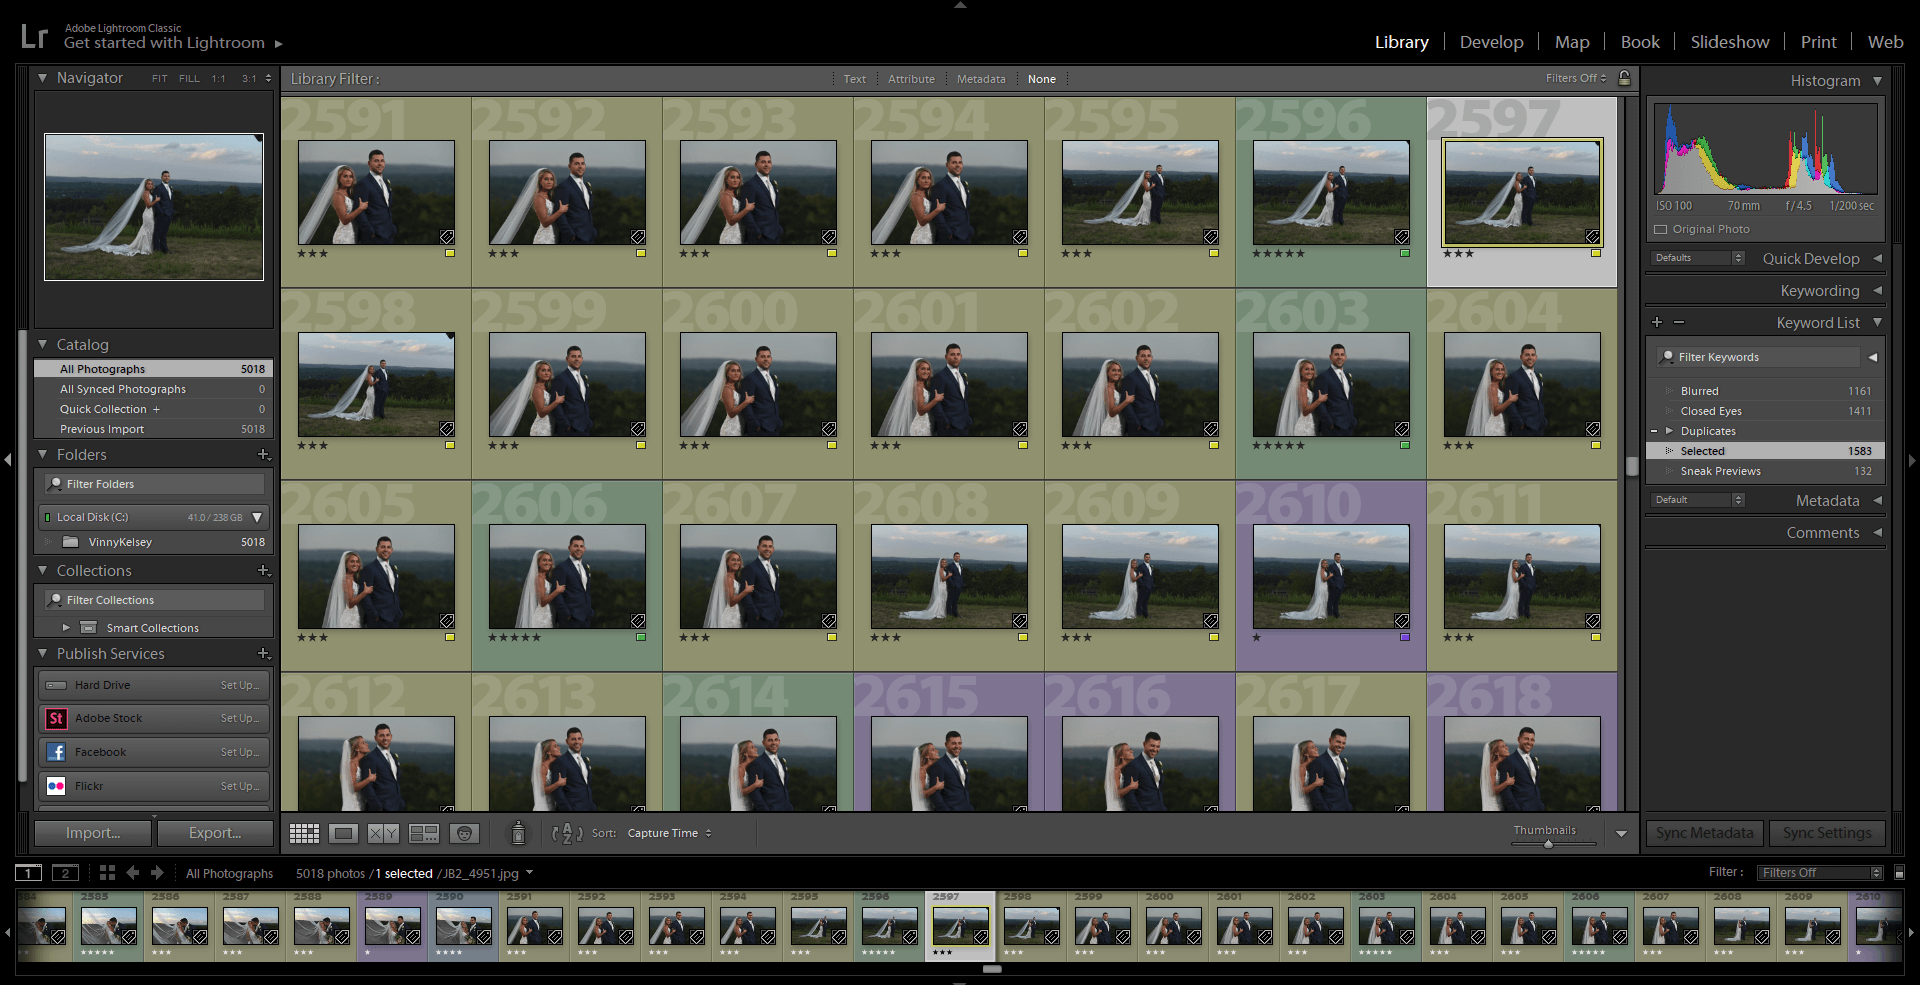
If you would like to import the photos manually, you can head to your source folder and drag-drop that directly into Lightroom or Capture One. Doing so will have the same results as exporting “All Photos” from AfterShoot into Lr or CO.
Troubleshooting
If you notice that something is not working as expected or encounter other issues with the app, it’s recommended that you head over to our blog on Troubleshooting some common issues that might occur while using AfterShoot!