


AfterShoot is a Premier Photo Culling Software.
Have you ever felt like you have way too many photos and no idea what to do with them all? If so, AfterShoot will be an excellent solution for you.
Photo culling is the process of reviewing and selecting the best photos from a larger group. Most photographers report that the culling process is the part of their job they like the least! However, it takes a lot of time to cull photos manually.
This is where AfterShoot comes in. It will cull photos for you, choosing the best images quickly so you can get your time culling photos back!
Watch Justin Benson Show how to cull photos using AfterShoot with just a few simple steps.
AfterShoot is designed to make the photo culling process quick and easy. With its simple interface, you’ll be up and running in just a few minutes, and AfterShoot will begin culling images for you.
From 1,304 images to 267 final images in just under 9 minutes!
Your culling workflow is about to get supercharged! Justin walks you through how he was able to take an engagement session he did from 1300 images down to a manageable amount of images in just under 9 minutes with AfterShoot. This is already saving so much time!
If you are a professional photographer or an amateur, it is important to be able to cull your images quickly and effectively. AfterShoot makes the whole process simple, fast, and painless.
First, Justin chose his workflow settings based on what type of photography he was doing. He set strict parameters for sharpness front to back and excluded images that seemed blurry or out of focus. He also excluded duplicate images so that the software would only pull up one from each cluster.
After he finished setting his parameters, Justin was ready to start culling. He hit the “start culling” button and let AfterShoot do its thing. In just under 9 minutes, it had cleaned up his image library, reducing 1300 images down to 267.
How to Set Up AfterShoot to Automatically Cull Your Photos with the Power of Ai
Creating a New Album to Cull Photos
When you want to get your photos into AfterShoot to cull, you can ingest them and make backup folders if you wish.
Ingest: This is the part of the culling process where you import your photos directly from a memory card to your hard drive.
Folder: You can also bring the photos in from an existing folder on your computer.
Backup Photos: You have the option to choose a working directory where the photos will be copied and culled, as well as a backup directory (optional) where your photos will be safely backed up.
You can keep the same folder structure or create a new one as well. If you need to rename the photos, you can do that within the backup.
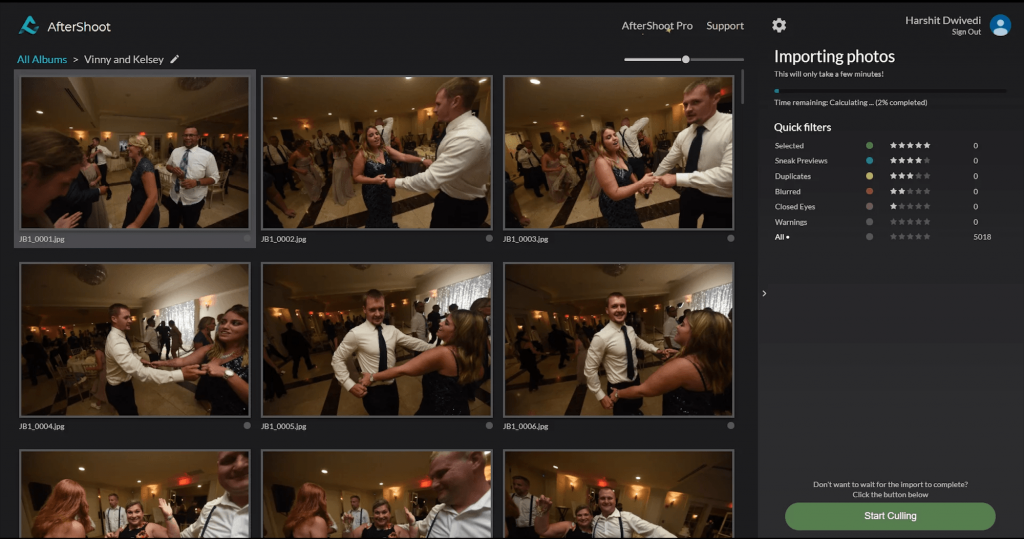
You don’t have to wait to start your cull! As your photos are ingested into AfterShoot, you can begin to set your preferences.
Setting Preferences in AfterShoot
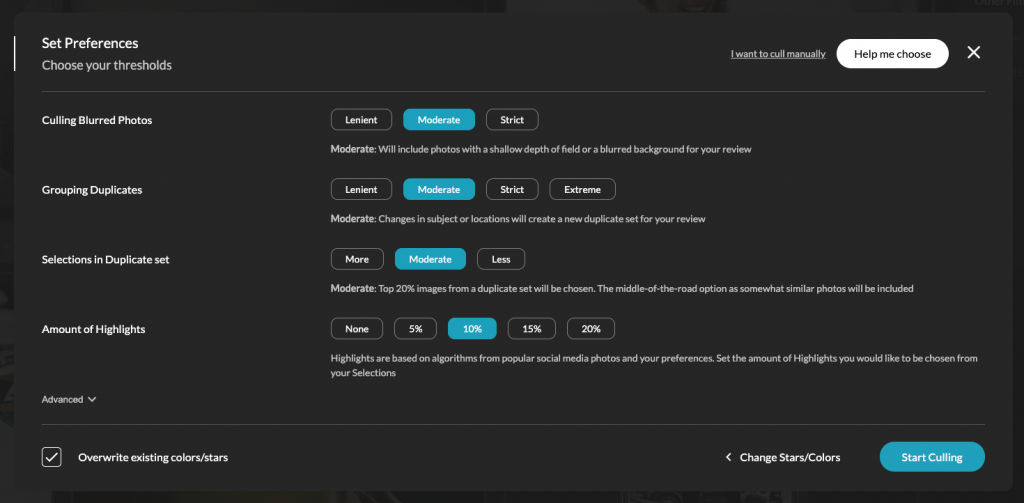
Choosing thresholds
Here is where you can really dial in your preferences with AfterShoot to customize your cull.
Culling Blurred Photos
This setting will always give you one photo from the set. For example, if you have 5 blurred photos, AfterShoot will deliver the one that it deems the best from the set. This allows you to make creative choices when you shoot and not worry that AfterShoot will exclude the photos.
Lenient: If you are more concerned about emotion than a photo that is a little soft/blurred, choose this setting, and AfterShoot will choose the best photo in the set. If you shoot wide open (1.4-1.8), this may be a good setting for you.
Moderate: The in-between setting! If you want some blurred/soft photos included but don’t want to be as strict as excluding anything that is not sharp front to back, this may be a good setting for your shooting style.
Strict: If you want very sharp photos with little leniency for soft focus, this setting will apply the most rigorous parameters and choose the sharpest image. If you shoot more closed down (2.8-4.0), this may be a good setting.
Grouping of Duplicates
This is how AfterShoot clusters your images together.
Lenient: Will break your images into smaller groups and will select more images from your cull. Will pull up subtle differences in the cull. For example, if you are doing headshots and you had a subject whose face was turned in different directions to the camera, AfterShoot will choose one photo from each pose.
Moderate: The happy middle. Will make choose images clusters without applying lenient or strict settings.
Strict: If you are shooting many similar images, you may want this setting as it will make more clusters of images but fewer images overall. For example, if you are shooting weddings, you’re probably taking lots of images of one scene, and AfterShoot will choose the best from each scene.
Extreme: This will cluster as many photos as possible together. For example, if you take photos of birds flying by in the sky in the same exact location, AfterShoot will cluster all of those photos together.
Selection in Duplicate Sets
The percentages of the grouping of duplicates.
Less: If you choose this setting and shoot 10 images, AfterShoot will choose one image.
Moderate: Will choose 2/10.
More: Will choose 3/10.
Volume of Sneak Previews
This setting will help you choose images for your sneak peeks. The choice is based on an algorithm that follows trending photos on social media that have performed well. You can then see if the chosen photos are on-brand for you and post them to social media quickly.
Volume: Choose from None to 20% of the take for sneak previews.
Advanced Settings in AfterShoot
Turning Filters Off
These filters can be handy if you have a particular shooting style and want to ensure that photos that might otherwise be excluded are not. For example, if you are a newborn photographer, changing the closed eye detection setting will prevent a photo of a sleeping baby from being excluded.
Turning off blur detection is a good choice if you are shooting landscapes or anything with a deep depth of field.
If you want more images than less in the cull, turning off duplicate detection is a good choice.
Overwriting Star Filters
If you have done any in-camera culling and ranked your images, turning off this setting will prevent the software from overwriting that information.
Ready to Cull!
Hit the “start culling” button, and AfterShoot will start to work its magic. You can walk away, and we’ll send you an email when the cull is done.
Restarting Culling
If you look through the images and the final cull isn’t what you would like, you can restart the cull. This will reset the parameters, start from scratch, and re-cull the photos in about 3-5 minutes.
Navigating Through AfterShoot
Grid view: this is where you will view your culled images. You can adjust the size of the grid to show you the images in whatever size thumbnail suits you.
When you are in grid view looking at your culled images, there are a few things to note:
The number in the upper left-hand side of the photo shows you that there are similar images to the image chosen. If you click on that number, it will show you the images on the right side of the screen so you can compare them to the one that AfterShoot chose. You can use your scrollbar or the arrow key to navigate through them.
If you see an image you want to exclude, simply hit the X key, and AfterShoot will move the image into the excluded category.
Loupe View: Double-click on the image to make it larger so you can see more detail, and you’ll notice on the right-hand side of the screen that there will be a close-up view of faces so you can really zoom in on expressions.
Swapping Images: If you find an image that you prefer, simply hit the S key, and AfterShoot will swap out the image it chose for the one you prefer.
Adding Images: If you like the one that AfterShoot chose and want another image included, hit the A key to add that photo to the cull.
Space Key: If you want to zoom in on a particular part of an image to check on expression, blur, etc., then place your cursor over that part of the image and hit the space key to zoom in.
Save Changes: Once you have made all the changes to the cull, hit save changes, and AfterShoot will save the .xmp files, which are small sidecar files that will go next to the original file. These files will allow the changes to be stored without changing the original file. Keywords, ratings, and star selections are all saved in the .xmp file. All those changes will appear when you bring the .xmp file into your editing program.
Exporting Photos: When it’s time to export, AfterShoot allows you to import to a folder or your editing program of choice. You control which photos are exported. For example, if you just want to export the sneak previews, you can export them to post.
AfterShoot is a game-changer for wedding photographers
Wedding photographers, in particular, are finding that AfterShoot photo culling software has solved their wedding workflow problems.
It doesn’t matter if you’re a prolific shooter or more reserved in your shooting style; AfterShoot can help you by culling photos faster. You don’t have to adapt your shooting style to spend less time culling!
Our mission is simple; we want you to create more and work less.